A new Ethernet module (such as the 1756-ENBT) has no initial IP Address. When replacing an Ethernet Module, there are a couple methods that are normally used to issue this IP Address.
One way would be to configure the DF1 Driver (or a driver to another communication module), and in RSWho, browse across the backplane to locate the Ethernet Module. You can then right-click the module, and choose “Module Configuration”, and then enter the IP address on the “Port Configuration” tab.
The method discussed in this document will be the “BootP” (Bootstrap Protocol) method. This will allow you to assign the IP address directly over the Ethernet Network.
To summarize these steps… When we power up the module, it will begin sending out the Ethernet Address, some also call this a MAC ID or Hardware Address. In the BootP server utility you will see these requests, and we just double-click the Ethernet Address to assign the IP Address. Don’t forget to disable BootP after the IP address has been assigned if you need the IP Address to remain static!!
1) Write down the Ethernet Address of the Device. This is a six-byte hexadecimal number embedded by the device manufacturer. This can be usually be found documented on the device itself once it’s removed from the chassis. If your device also has an alpha-numeric display, and no IP Address has been assigned yet, you might find this ID scrolling on the face of your device. An example of an Ethernet Address might be: 00:00:BC:1E:98:D9.
2) Open the BootP Server. This is usually installed when you install RSLinx Classic. This is under Start | All Programs | Rockwell Software | BootP/DHCP Server.

3) Once the server is open you may have to enter some network details such as the Subnet Mask and Default Gateway. Usually, just the Subnet Mask is required. A common Subnet Mask is 255.255.255.0
4) Power up your processor, and you should see the device begin to request an IP Address:
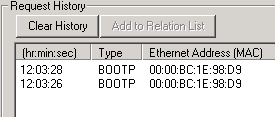
5) Double click the MAC ID of your device. Be sure you are on the correct MAC ID. Entering the wrong IP Address into the wrong device could have disastrous consequences!!! Some sites will even have procedures in place to disable all other network adapters, and plug directly into the device with a cross over cable to minimize the chance of getting the wrong IP Address in the wrong device. You can also enter a hostname and description at this time if required. Most sites I’ve seen only require the IP Address. Be sure to hit “OK”.

6) Now you can attempt to ping the device to verify the IP Address is responding. You can do this from the command prompt using the PING command.

7)If you wish for this IP to be static, be sure to disable BootP for this device. You can right-click the MAC ID in the relation list (in the bottom frame of the BootP Server), or highlight the MAC ID in the relation list, and use the “Disable BootP/DHCP” button. If you happen to get an error when doing this, just attempt the request again.
8) If possible, cycle power to ensure the device held the IP Address.


